Any good home care scheduling software should have lots of canned reports that make it easy to get the most common information out quickly. But it should also allow you to get hold of the data itself for more in-depth, ad hoc reporting.
This is something that we often work on with our Rosemark customers, so I thought I’d offer some thoughts on how to make use of the data once you get it out. If you are a spreadsheet geek, you probably already know all this and more. But if you find spreadsheets daunting and confusing, this might help you get some great value out of these very powerful tools without a lot of pain.
In this first article we’ll touch on:
- Exporting the data
- Spreadsheet basics
- Sorting
The examples here use data as it comes out of Rosemark and Microsoft® Excel 2010. However, the concepts should apply to most data as well as most spreadsheet programs. In the next article, I’ll go into more depth, but we’re starting out very basic.
Export Spreadsheet Data
In Rosemark, you can export data very easily as a CSV file. ‘CSV’ stands for ‘Comma Separated Values’ and is a very common data format. On most computers, it will open automatically in Excel. If you are using a different program and already have the data you want to work with, skip this section.
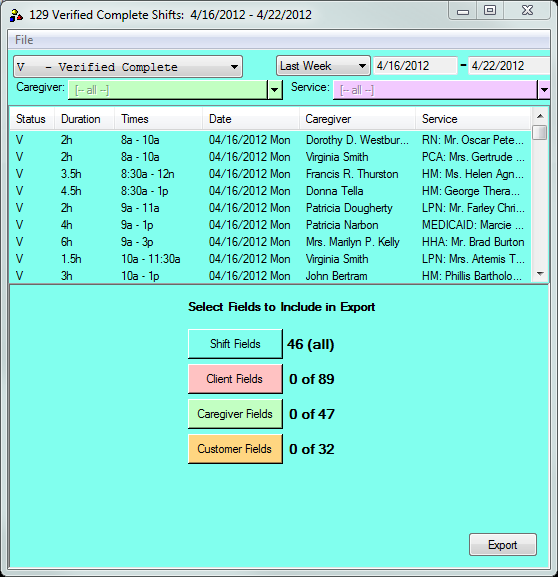
To get started, simply pull up a list of the shifts you want to work with, click on File, Export Shifts to Spreadsheet. At that point, you’ll get a set of buttons that allow you to pick and choose which fields will be exported. Once you’ve made your selections, click the Exportbutton to save the file.<
Spreadsheet Basics
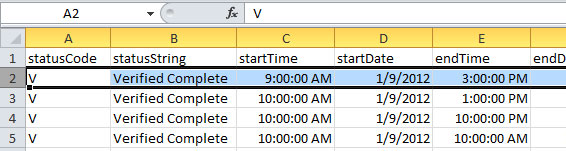
There are a few basic concepts that will help you to be comfortable around spreadsheets. First of all, spreadsheets are all about rows and columns. Each row is a record (in this case, a shift) and each column is a specific field within each record. Each individual box (called acell) is referred to by its column and row (for example, D2 is the 4th column, 2nd row). The top row typically has a label for each column, identifying which bit of information (field) is contained in the cells in that column.
You can select a row or a column or entire block of cells by clicking in the right place (and dragging, if need be).
- To select a column, click the column letter at the top
- To select a row, click the row number on the left.
- To select a block of cells, left-click the first cell, hold the button down and drag to the last one.
- To select ALL cells, just click the little box to the left of column A and above row 1.
You can make columns wider by putting the mouse right between the columns (’til it turns into a double-arrow icon) click and drag. Same thing for making a row taller (though this usually takes care of itself, if you have wrapping turned on).
Tip: if a cell has nothing but a bunch of #’s in it (e.g. #####), it’s just too narrow to show what’s inside. Drag the divider between rows to make it bigger. Or, select a bunch of rows, then drag the divider between two of them to make all of the selected columns change size.
OK, that’s the bare-bones basics of working in a spreadsheet. There’s lots, lots more, but that ought to get you going.
Sorting
Sorting allows you to change the order of the rows to be more useful. For example, you may want to sort by the date of the shift (in fact, that’s the default way it comes out of Rosemark). But what if you want to group the shifts by Client, or by Caregiver? Excel gives you lots of control over this, so it’s easy to do.
First of all, select the whole spreadsheet (click the top-left box). This is very important! If you have a subset of the cells selected, Excel will think that you only want to sort within that selection box. This can lead to some very confusing and unhappy results!
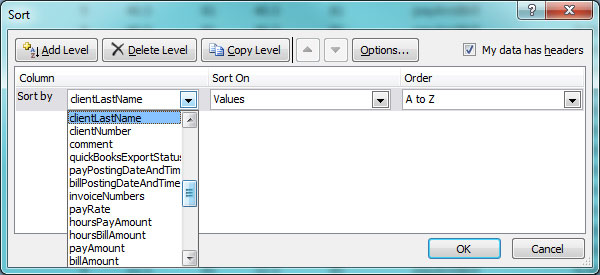
Once you have selected the whole spreadsheet, click the Sort & Filter button (shown on both the Home and Data tabs), then click Custom Sort (note that there are some shortcuts for basic sorts, but we want to have more control than that). In that box, click on the Sort bydropdown and select the field you want to sort by there, then click OK.
You should see your spreadsheet change, with all of each client’s shift grouped together.
Complex Sorting
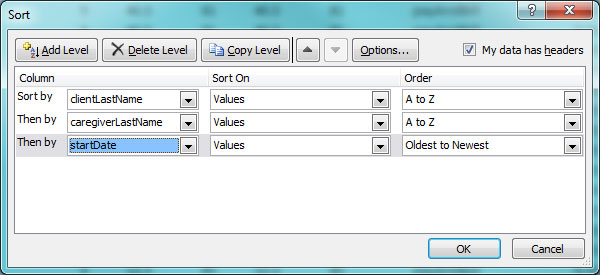
Often, what you really want is to sort by more than one field. For example, you might want to see the shifts sorted first by Client, then by Caregiver, then by Date. To do that, you start by following the same steps as for simple sorting. For the first Sort by, choose the clientLastName field. Then click the Add level button. This will create a second Sort by row; in that one, select the next field you want (caregiverLastName). Repeat until you have all the criteria in place.
There are quite a number of other options associated with this function, but that will get you started. A couple of things that are important to keep in mind:
1) The order of the sort levels is very important (e.g. sorting by date first, then client is very different than sorting by client first, then by date).
2) Notice what the Order dropdown is set to (e.g. if you want the most recent on top, you have to change the date Order dropdown).
I hope this has been a helpful start in your quest to gain greater understanding and control of your data. In my next article of this series, I’ll talk about Advanced Navigation and Selection Options, as well as ways of hiding and showing data to simplify and clarify.
As always, if you have comments I’d love to hear them, and if you’re struggling with your spreadsheets, give us a call!